
How we used social media to plan our upcoming trip to Asia
We’re less than a month away from our upcoming Asia trip, which will take us to Hong Kong and Tokyo over a couple weeks this Halloween and early November. Our first trip to Tokyo was last spring and after the first full day in the city, we knew we’d want to return to Japan soon and often if we could. It’s now only a year and a half later and we’re very happy to be headed back, excited to be adding Hong Kong to our itinerary, and thrilled that our friends Chuck and Sally are joining us.

We’ve talked for a couple years about planning a Tokyo trip with Chuck and Sally but were unable to work out getting them to join us on our first trip. The first trip was booked on a whim after Nick sent me a pretty great deal on airfare from his work e-mail. We got on the phone and immediately pulled the trigger on booking a dream that we had long talked about but had kept putting off time and again. I was getting coffee with a good college friend of mine at the same time Nick and I were impuslse-booking those flights and she, after hearing the price, called her boyfriend and booked the trip alongside us. Jackie, Matt, Nick and I all planned that trip together over about four months, over several in-person meetings and numerous text messages. While the trip turned out to be an incredible experience for all of us, planning our first group trip like that was often frustrating and difficult. Links to Airbnb listings, city attractions, and points of interest were shared via group text message and a lot would get lost in that on-going message thread. Major decision-making was almost exclusively left to lengthy in-person group meetings where we all discussed and decided together on key aspects of the trip. We ended up spending a lot of time trying to find things lost in those text message threads during the in-person meetings but the plans eventually came together.
Suffice to say, it’s tough to plan an international group trip where everybody wants to see different things, has different preferences on where to stay, and has different budgets to work with. So when we started planning a group trip with Chuck and Sally this summer, I knew there had to be a better way. This trip also doubles as Chuck and Sally’s honeymoon, so going in, Nick and I really wanted to make sure the trip was super special for the newlyweds while keeping the trip satisfying on our end as well. Luckily, we all kind of were in agreement on the foundations of what we all wanted out of the trip. Like with every group trip, everybody has had to forego some things — seeing Tokyo Disneyland at Halloween or taking a day trip to Mt. Fuji just wasn’t in the cards this time but we all knew that we’d be making some concessions. I ended up taking the lead with some aspects of planning and luckily the group’s been very patient with me while I tested out some ideas I had on applying social media to trip planning.

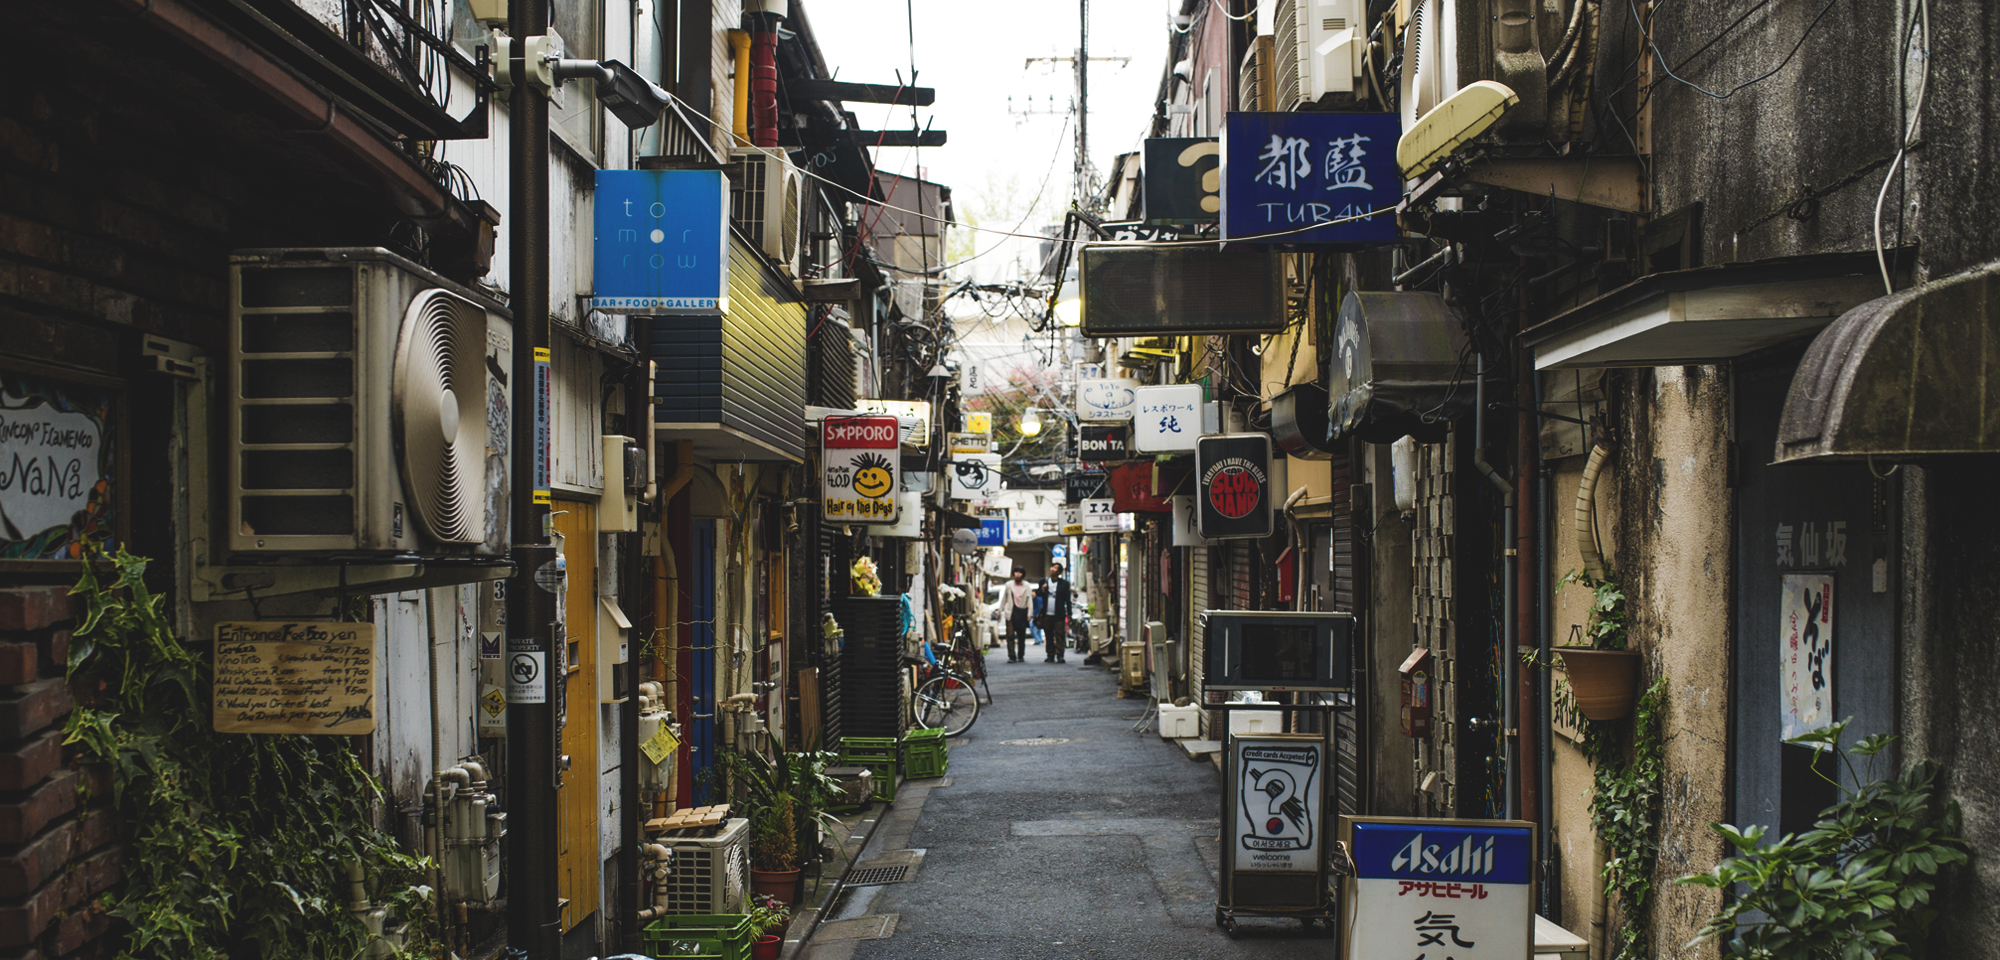
I appreciate that patience and trust from the group because I’m not really that great at trip planning. I fall into one of two camps: I either don’t plan much at all and just figure it out once I get there, or I over-plan to the point of obsession. In my experience, neither approach is great and can lead to varying degrees of disappointment, frustration, or disaster when you’re at your destination. Nick planned our first Tokyo trip and it definitely walked the line of over-planning which I, at the time, was totally on board with. Nick planned amazing walking tours of the city that took us through large sections of Tokyo, stopping at great points of interest along the way. On paper, the plans looked great and we figured we’d get a lot done in a city that has an overwhelming selection of things to do and see. It wasn’t until we got there that we realized that we had over-planned. Nick’s walking tours had us on fairly strict schedules every day, which left little time for exploration — something that we quickly discovered is absolutely critical in a city like Tokyo.

Nick’s walking tours left us with a predicament: do we stick to the schedule a miss a ton of great stuff we were walking past but wasn’t on the itinerary, or do we stop and explore some of those things but end up not seeing everything we had planned? These are tough choices to make when you’re in the moment, in a group, and in the middle of a foreign city you have limited time in. On the flip-side, Nick left the majority of our fall 2016 Paris trip planning to me. After our over-planning of Tokyo, I took a very casual approach to planning Paris. In fact, I made no real plans and only made a short list of must-dos, which included Disneyland Paris, the Eiffel Tower, and a few museums that participated in the Paris Museum Pass program. I figured leaving a lot of time open would allow us to explore more and wander, hopefully stumbling across things that we’d otherwise miss. Simply put: the plan backfired on me. Even a week out from the trip, we had no real plan of attack for Paris except flights and accommodations. Needless to say, we ended up having to wing much of that Paris trip. The Museum Pass saved the day and we ended up museum-hopping a good portion of our time in the city. That turned out to to be a fine solution since Paris is full of great museums and having majored in art history, I loved finally seeing a lot of works in person that I had previously only seen in books and slides. Still, my lack of planning left us with little to do outside of the safety net of the Museum Pass. Because we didn’t research much before the trip, we didn’t really know much about Paris’ neighborhoods and districts. The lesson we learned is that having free time to explore is only really useful if you know where to explore. We had a lot of time to explore but had no idea what to explore and would find ourselves wandering aimlessly at times, which sometimes just felt like a waste of time rather than well-used discovery time.

Don’t get me wrong, both international trips we took last year were amazing and there were times when Nick’s approach with over-planning worked out amazingly well in our favor, leading us to see a lot of amazing things in a relatively short time. Likewise, my under-planning led to a few super memorable, leisurely evenings in Paris. There’s definitely times when both planning styles work out but it’s inconsistent and is a gamble. That gamble isn’t really a problem if time and/or money aren’t a concern or it’s your third or fourth time visiting a specific city. But for us, and I’d guess most of you, spending the time and money to travel internationally comes with the desire get as much out of the trip as possible.
So, when we started planning this trip with Chuck and Sally we offered our experiences and, as a group, settled on trying to find a middle ground — a hybrid of Nick’s walking tours and my wing-it approach. With this being Chuck and Sally’s first international trip, we wanted them to really get a good sampling of Tokyo and Hong Kong but also enjoy the cities the way they wanted to: with plenty of time to explore and discover. We knew we could offer some advice on what to do in Tokyo but figured it would need to be a totally collaborative effort on group plans in Hong Kong.

Sitting around and doing numerous marathon planning meetings to plan everything was just impractical, so I figured there had to be a way to make the trip planning easier online. So, I went to Facebook to see if I could leverage Facebook Groups to our benefit.
Planning it all out in Facebook Groups
Facebook.com/Groups
When setting up the group, I made everybody a group admin in settings. It made sense to me to make sure everybody had equal standing in the group, and thus, an equal voice both symbolically and functionally. I also made sure the group was “secret,” to avoid getting a lot of unsolicited advice from folks that aren’t traveling with us. Advice is great and we asked plenty of people for it (thanks Chris at TDR Explorer, Tom at Disney Tourist Blog, Jeanine, Drew, Mark, and others), but I think it’s better to go outside of the group for that and bring what you find back to into the group. I figured having the group be a free-for-all on Facebook with outside parties able to comment and make suggestions would just muck up our ability to plan effectively.

Facebook Groups: Discussion
The main Discussion section of the group is where we did the majority of our planning. Since we’re going to two major cities on this trip along with two Disney Resorts, I made separate threads for each city and each Disney resort. The threads for Disney resorts let us discuss how much time we wanted to spend in the parks, which days we wanted to be in the parks, share ticket pricing info, park hours, ride closures, dining info, and more. The city threads were much longer than the parks threads since we all posted just about everything and anything that seemed interesting to us.
I also used the Discussion area to make a checklist of what we still had left to plan, decide on, and book. The checklist thread felt kind of silly at first but it was really useful in practice. I’d update the checklist thread’s original post accordingly after something had been completed or booked, which made for a good visualization of where we were at in terms of planning. It can become fairly daunting to make sure everything you need to take care of for an international trip with multiple destinations, accommodations, and attractions, so having a group-wide checklist felt more helpful to me than everybody keeping their own lists.
Facebook Groups: Pinned Posts
Facebook Groups let you pin a single post to the top of the Discussion area of the group. I used this feature to pin a few different posts over the last few months that had important information for that particular point in our trip planning. The pinned post changed a few times over the course of our planning but the current pinned post (seen in the screen grab above) is a link to our Google My Map. I’ll go into the Google My Maps in depth in a bit but basically, we used the maps to plot out our wish list of things-to-do in rough day itineraries. I do wish Facebook would beef up the pinned post feature and offer functionality that would allow you to pin multiple, categorize, or flag posts as important for easier access. Sometimes posts can get lost in the discussion section, so being able to flag a few important threads instead of pinning just a single thread, would be really helpful.
Facebook Groups: Recommendations

Facebook has a site-wide built-in “Looking for Recommendations” feature that you might’ve seen your friends sometimes use in status updates. This feature is carried over to the Discussion area of Facebook Groups. After starting the group, I made separate discussion threads for both Hong Kong and Tokyo using the “Looking for Recommendations” feature. Making separate threads helped make it easier to sort what we were interested in doing in each city. The Recommendations feature also opens up the ability to link to a relevant Facebook page for the point-of-interest you’re posting about. With that feature at my disposal, I made sure all of my recommendations were individual posts in the thread, linking to the Facebook page if it was available.
Linking the recommendation to a relevant Facebook page dropped a pin on a map that Facebook was automatically creating. That map is accessible and interactive when you expand the post. Our various recommendations to each other are there, visualized on the map, which gave us a good idea of how much exploring we might be taking on across the city.

 Facebook Groups: Events
Facebook Groups also have Facebook Events integrated, which we really only used for things that we pre-booked with hard tickets or reservations. Facebook Events is kind of quirky and on the Events list (below), your local date and time is shown for the event, but when you click on the Event (right), the actual listing reflects the local date and time for the event location. It’s a little wonky and can be a bit confusing if you’re looking at your list at a glance for reference but it’s a minor issue. I made events here for our flights, hotel bookings, Airbnb bookings, and ticketed attractions — basically anything that we had to pre-book and/or pre-pay for. In each event listing, I made sure to include relevant info: flight times, room check-in and check-out times, reservation times, ticket prices, etc. This feature is a good alternative to making a shared Google Calendar; it’s not perfect but it saves you from having to go to a separate site to see what you have planned.
We used the discussion functionality in the individual Events listings more or less depending on if we were still working out the details together. For example, I made Events in advance for some things I knew we all wanted to do but hadn’t quite decided on date or time. The dedicated event listing solidified the point-of-interest as an agreed upon part of our trip and we were able to hash out the details, change the date, or discuss other details in the comments of the Event listing. When we came to a consensus and booked, I updated the post with the finalized booking information, date, and time.

Facebook Groups: Files
With a bunch of different things booked, receipts and tickets can get lost in your e-mail. Facebook Groups allows you to attach files and we tried it for a couple things but I wasn’t really a fan because you couldn’t organize the files in any meaningful way. I opted to make a shared Dropbox folder instead, which I could organize in folders by city, booking type, etc. Maybe that’s just my need to have files like this organized. Facebook Files might end up having been the better choice for us after we get there but I think using Dropbox for this will work out fine for us.
Mapping it all out with Google My Maps
Google.com/MyMaps
Over the course of a couple months, a ton of posts in our Facebook Group, and several in-person meetings, we got to a point where we had a bunch of things we wanted to do but not really any idea of how to get them all done. Our primary reason for going to Tokyo and Hong Kong is to see their respective Disney parks; so we knew that our visits to those parks would act as anchors for the trip. Early on, we decided on seeing Hong Kong Disneyland at the end of its Halloween season and getting to Tokyo Disneyland just as it starts its Christmas offerings. Because of the dates of the seasonal promotions, we knew we had to see Hong Kong Disneyland no later than October 31 and Tokyo Disneyland no earlier than November 8. This info guided us in laying out the rough schedule of our trip: booking our flight between Hong Kong and Tokyo, which days we wanted to spend in the cities, and booking Airbnbs and Disney-area hotels. After all of the theme park stuff, room bookings, and flights were settled, we had to figure out how to fill our days in the cities.
While we had a lengthy list of things to do, places to see, and stuff to eat, we also knew we didn’t want to over-plan anything. We decided on several things we all really wanted to see and do as a group and kind of earmarked everything else as things we’d like to do but won’t be heartbroken if we miss. Sorting out our list of things-to-do and arranging a hierarchy for those things was an important step but I knew we still needed to at least make some sort of game plan if we wanted to actually see any of things once we got to Asia.

Once we narrowed down our list of must-dos, I figured Nick and I could start plotting out loose walking tours like our last Tokyo trip while being sure to keep them much less packed to avoid over-planning. Nick plotted out the first trip’s walking tours by customizing suggested walking tours found in the excellent DK Eyewitness Travel Guide for Tokyo. He took his customized walking tours and made individual maps for each day of the trip using Google’s “My Maps” feature. The tours in the Eyewitness books are great but are geared heavily toward historic landmarks and cultural sites. While we have plenty of those on our list, we didn’t want to focus exclusively on that stuff this time out. Instead, we opted to make our own sightseeing tours mixing in a little bit of everything so we could really get a broad a sampling of Hong Kong and Tokyo without needlessly overloading ourselves.
So, with all of that in mind, I took to Google to see if we could use their tools to suit our needs.
Google My Maps
I’m pretty oblivious to most of Google’s various online tools and applications, save for Google Hangouts and Gmail, which I use regularly for work. I use Apple’s built-in Maps or the Waze app on my phone for most way-finding needs but do use Google Maps superficially when I’m on my personal computer and want to see a map or directions to somewhere. Anyway, I knew from our last Tokyo trip that we could map out walking tours and save those maps in my Google account (I still have them and referenced them a couple times when planning this trip) so I figured we’d do the same for this trip. The only down side is that when Nick set up those tours, each day was a separate map, so it’s a little tough to see your trip as a whole or move an item from one day to another as your plans evolve.

Google My Maps: Layers
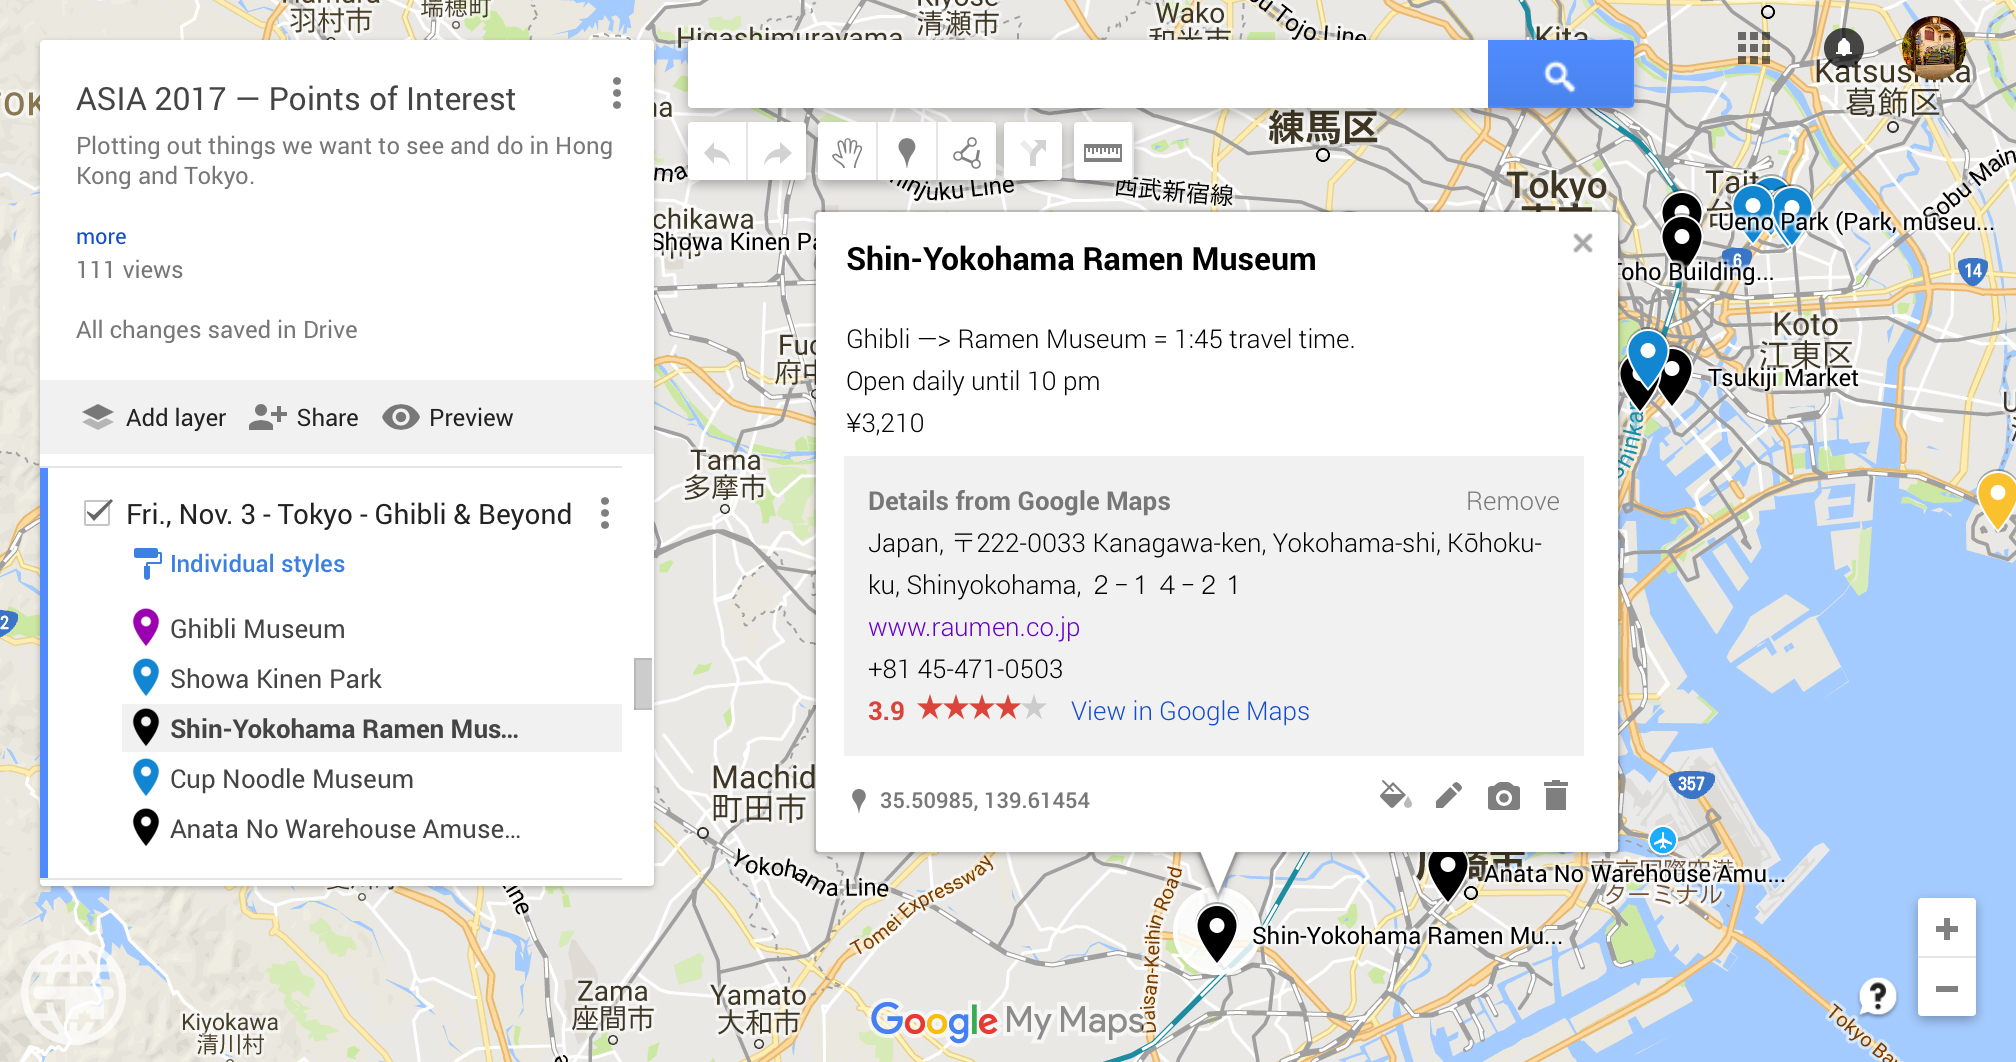
I was fully prepared to lay out the trip over multiple maps if I needed to, just as we had done before, until I stumbled upon the layers feature. I’m not really sure if Google has introduced new functionality since we traveled to Japan last year or we just missed it entirely last time, but My Maps on Google allows you to make a single map with up to 10 layers. This was a game changer — I could effectively break up a single map into individual layers, with each layer representing a different day of our trip. This was great news except, of course, our trip is 16 days total. I figured if I needed to, I could split the map into two separate Hong Kong and Tokyo maps. It ultimately ended up not being a problem at all, after I decided to exclude our two full days of travel to and from Asia and the four days we’re spending at Tokyo Disney. The 10 layers ended up working out perfectly for us but if you plan a longer trip, you may have to work around this a bit.

Having multiple layers on a single map turned out being a godsend for planning. Facebook Groups and in-person meetings had given us a place to collaborate, make suggestions, and agree on certain big decisions while Google Maps allowed us to then take everything we had discussed and lay it out in a practical way that allowed us to visualize how we could feasibly see everything we wanted to see in the time that we had.
I dug through our threads in the Facebook Group and dropped pins on the Google Map for just about everything that had been suggested in the threads. There were some things that had been previously ruled out by the group or were simply impractical given the time we had in each city (day trips, some big-ticket attractions, etc.) From there, I started organizing all of the dropped pins on layers based on their proximity to each other, which was super easy since pins can be dragged and dropped across and onto different layers. We had a couple things to keep in mind: we had already booked tickets for the Ghibli Museum near Tokyo (booking those tickets goes through a lottery system; you provide a few days you’re available to visit and if you win tickets, they choose which of those days you can visit) and we knew places like Ueno Park’s museums or Tokyo’s famed Tsukiji fish market were closed on certain days of the week. Thankfully, we had researched all of this and made notes in our Facebook Group discussion threads, so I was able to easily reference all of that as I was making the map.


The map was a big undertaking and was a project I obsessively, but happily, worked on over a few nights. At this point, after my borderline insane planning threads in the Facebook Group, everybody just kind of let me do my thing with the map. After I sent them all invites to look over the map, they all were pretty happy with the end result and everybody was free to edit the map or give suggestions on how to tighten up or reorganize the plans where it would be beneficial. The icing on the cake with the map is that it’s totally accessible on mobile devices — pins, layers, and all — from both the Google Maps app (first image above) and in the web browser (second and third images above). That’s huge and our plan is just to pull up the map each day on our phones while we’re in the city to see what’s on next the itinerary.
Google My Maps: Customizing Dropped Pins
As if dropping pins at every. last. thing. your travel group has discussed seeing (we put just about everything on there; from little bars we want to check out to major attractions like Victoria Peak in Hong Kong, to quirky photo-op diversions like the Godzilla head in Tokyo to the Disney parks) wasn’t enough, Google also lets you customize your dropped pin. You can change the name of your pin if you want, which I did at times for clarity and simplification. It’s a small feature, but helpful.
The other thing that is great is that My Maps lets you make notes on the dropped pin. For days where we had multiple must-do things, we included travel time estimates so we could plan accordingly and Nick added estimated train fare from place-to-place (travel time and fare estimates were pulled from Google Map’s built-in public transportation feature). Other notes included business hours for reference. Google also automatically includes official website links, addresses, and Google ratings if the dropped pin is for a recognized business or landmark.
The other thing I really liked was the ability to color-code dropped pins (you use the paint bucket button when you expand your pin — see the image below). Dropped pins come in an default blue color and I left all of the things we’re interested in but aren’t scheduling as must-dos in that color. Everything we have tickets or reservations for were made purple, our non-ticketed must-dos are black, our accommodations in dark red, and Disney parks are a golden yellow. For me, color-coding the map kept me from over-planning any of the days: the pin colors let me see how busy each day was with must-do items and how everything else would be bonus if we got to it.
Testing it all out
So over 4,000 words later and about four months of planning later, that’s about it. We leave in just under 20 days and I think we’ve, for the most part, got all of our ducks in a row. Like I said at the top of this post, I’m certainly no expert at travel planning, let alone planning a major international trip for a group… but after stumbling through two trips last year, I’m hoping Nick and I are on the right track to refining our travel planning skills.

Hopefully all of this planning online will translate well once we get there. We’ve got our Wifi hotspots booked along with backup battery packs for our phones, so we should be able to pull up our plans at any moment and have a good idea whether we’ve wandered too far off track between our must-see spots. And if the planning ends up being a complete disaster, we can re-plan on the fly! I’m so excited for the trip and can’t wait to explore Hong Kong for the first time with Nick, Chuck, and Sally and then introduce our friends to Tokyo, a city we instantly fell in love with last year — hopefully they’ll fall in love, too!
Have you ever used Facebook Groups, Google My Maps or some other social network or online service as part of your trip planning? How did it work out for you? Let me know how it went for you in the comments, I’d love to hear your experience! Thanks for reading!
Facebook, Google and any other copyrighted images used in this post are presented here for illustrative purposes only and are copyright by their respective owners.